Needing a bigger pack for 5×7, I settled on a modified Kelty P1 from Photobackpacker.com. A nice upgrade from my Kelty Redwing- better suspension, more room, and still lightweight. But the full zipper allowing total access to the main compartment was the main attraction. The zipper on the Redwing stopped about 6″ from the bottom of the pack, making access to the stuff at the bottom a hassle.
Because the pack is so lightweight, it is essentially formless. Basically it’s just a shell. Photobackpacker offers an ingenious solution of a rigid backer-board that is covered with a material similar to the loop material in velcro, making it possible to attach a wide assortment of zippered cases they make to fit popular cameras, lenses,etc. The problem is that none of the cases seemed close enough to the sizes of what I need to put in them, and the other problem is, well, a few cases plus the pack itself can add up to a whole lot of zippering to do when taking a photo.
I have a decent sewing machine so I made a few mods last weekend-an outer shell of duckcloth and thin foam to give some form and shape to the pack, a covered partitioned compartment for lenses and an insert for the front pouch to hold accessories, and some soft filmholder pouches made out of dark-out cloth that nest inside the auxiliary side pockets.


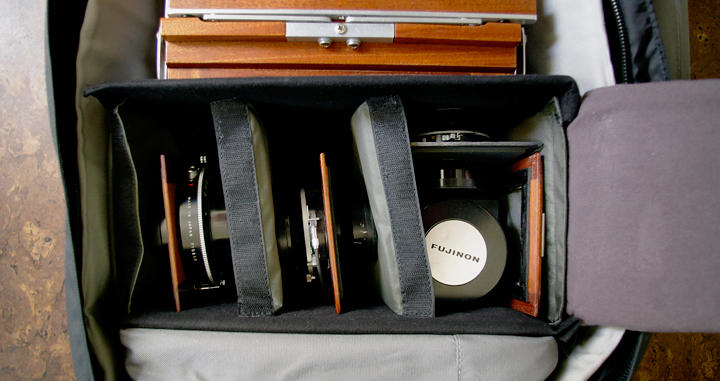
Inside 5×7, lens shelf, and space for extra holders in the bottom. Shell made from duckcloth and 1/8″ hobby foam. I wish I would have made it from the ripstop nylon to save a few ounces, but only had a little of each material on hand, hence the patchwork quilt look. The shell is essentially a closed horse shoe shape with a rigid bottom piece that attaches with Velcro. The shell attaches to the backer-board panel from Photobackpacker.com with elastic and some button holes for the pigging string to tie to.
It is a little too formless as is, so I’ve since added panels to the bottom of each side of the shell to help reinforce the pack and give it some rigidity. I cut a horizontal slit in the shell 12″ up on each side, slid in a 6″x12″ shatter-proof lexan panel, then stitched it closed to lock in place. This improved the shape a lot, makes the zippers easier to work one handed, and also keeps the tripod from crushing the pack when I lash it on the side.

Lens compartment. I made two rigid shelves with 1/32″ garolite left over from the last filmholder batch, wrapped it in 1/8″ foam and covered with duckcloth. There are velcro tabs on each side and the back for attaching to the backerboard and the sides. I re-purposed some case dividers from another camera bag, then made a cover out of foam-stuffed fabric that sticks to velcro tabs on the partitions, so it can be opened from either side. The lenses are very secure since each partition is supported top and bottom.

Panel insert for front pouch. Made from lightweight 1/8″ foam and ripstop nylon. The panel itself acts as a partition in the front pouch, can store large flat items such as bag bellows behind it. I made the tops pockets un-pleated and somewhat form-fitting for various cards and flat-ish things, and used elastic banding instead for the bulkier 3d items. This has the bonus of keeping everything from flying out of the pockets when the very act of opening the pack turns everything in the front pouch upside down. Since taking this picture I’ve added a few snap buttons to the top of the insert that attach to the pack to keep it from sagging.


Pouches are made out of a single layer of hotel black-out drape material from the local fabric store. (Handy stuff- great for focusing cloths too, pictured in the margin above.) I stitched in a piece of thin garolite for the bottom to give the pouch some rigidity and made a simple closing top with velcro. I goofed and mis-located the top piece of velcro, only one is needed. The fabric gets ragged fast if you try to unseam mistakes so I just left it.


Another great feature of the pack- 2 generous full-width mesh pockets on the main compartment flap- perfect for compendium shade, filters, cleaning cloths, etc. (The metal disks at top are the backside of the snaps used to hold the panel insert in place.) Bottom pictures shows other side of snaps, space behind the insert for bag bellows and the original factory pockets.

~40lbs. The tripod is lashed to the side with compression straps and a strip leather hoop for a leg spike to sit in. Outside pocket on right has 6 readily accessible holders and can be swapped when exposed with the identical pouch in the bottom of the pack. Next I would like to make some belt pockets for quick access stuff like drugs and trailmix, maybe a small MF folder. But that is probably beyond my sewing skills.
After using this for a few months now I can say it’s the best pack I’ve used to date. The P1 fits very well and is very comfortable, and access to everything is as good as I can imagine. I’ve done several 5+ mile hikes and I don’t start to fume and grumble at the end of the outing from fatigue like I do with my 5×12 outfit in a Mountainsmith Odyssey, which is actually a lighter load.
Updated version here-